This week was all about repurposing- finding new ways to use something that already exists! Watching Punya Mishra and Matthew Koehler's video on Teaching Creatively got me thinking about the idea creating something NEW, that is novel, effective, and whole. I began thinking about my own use of technology in the classroom and the fact that I tend to rely on tech that already exists for a specific purpose, nothing that I would consider novel. My goal then was to think of some NEW way to have my students use technology to aid in their understanding of a complex topic.
I choose to purchase a Makey Makey for my maker kit. During my "playtime" this week I was exploring the Makey Makey website to learn more about what it could do. I made Banana Bongos and tried my hand at using Scratch to write a program to play pong with the Makey Makey. The great thing about Scratch is that there are lots of pre-made programs you can use too! I spent some time looking through them and found a Timer program. The program itself starts the timer when you release a key and stops the timer when another key is hit. This got me very excited! My students struggle with the idea that objects that look different will fall at the same rate due to gravity. Here I had found a timer that would essentially measure the time of free fall! This fit right in with my goal- students would be able to use the Makey Makey to measure free fall of different objects and compare them. It is a complex topic and this would aid in their understanding!
I liked the Timer program I had found, however it was a little more complex that I thought my 8th graders could handle. Instead of having it display the approximate height that the object was dropped from, I would want them to measure the distance themselves, so all I wanted was a simple timer. I decided I would attempt to program one myself! I used the program by Chris Sudyk, Rose Elliot, and David Hay from the University of Alberta as a guide to write the program. The code I used was similar but I modified it to remove the height and to make the ball move as it dropped.
The objects that I planned on dropping all came from around my house. I wanted to find things that students could find around their own homes or in our classroom. Anything conductive will work, and you can use nonconductive materials by putting a layer of aluminum foil around them! I chose a coin, spoon, lemon, and a golf ball to test out my prototype.
How to Create a Makey Makey Drop Timer

You will need:
- A Makey Makey
- 3 Alligator clips
- 1 USB cord
- Tin foil
- Various objects to drop
- A computer with internet access to use the Drop Timer
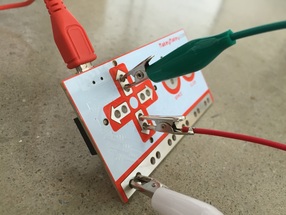
Step 1: Hooking up the Makey Makey
Connect the USB cord to the top of the Makey Makey. Do not connect the USB to your computer yet! Take one alligator clip and connect it to the bottom of the Makey Makey where it is labeled Earth. Then connect another alligator clip to the up arrow and another to the down arrow. Your Makey Makey should look like the picture on the right.
Connect the USB cord to the top of the Makey Makey. Do not connect the USB to your computer yet! Take one alligator clip and connect it to the bottom of the Makey Makey where it is labeled Earth. Then connect another alligator clip to the up arrow and another to the down arrow. Your Makey Makey should look like the picture on the right.
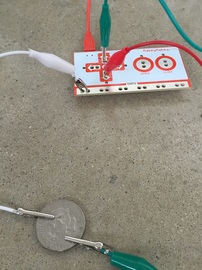 | Step 2: Grounding the Makey Makey In order for the Makey Makey to work, you must ground the circuit. Since you will be dropping the object we will connect the Earth alligator clip to the object you are dropping. If the material is not conductive (for example the lemon), you will need to wrap tinfoil around it to connect the Makey Makey. Your set up should look like the picture on the left. |
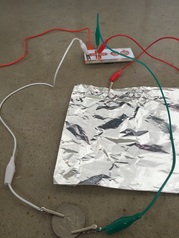
Step 3: Connecting the Keys
Your falling object will act as both the ground and the up arrow (this starts your timer). To do this, connect the up alligator clip to your object.
Remember: you will need to reconnect both the up and Earth clips when you change objects.
The down arrow alligator clip will be connected to a small square of tinfoil on the ground. Your set up should now look like the picture to the right.
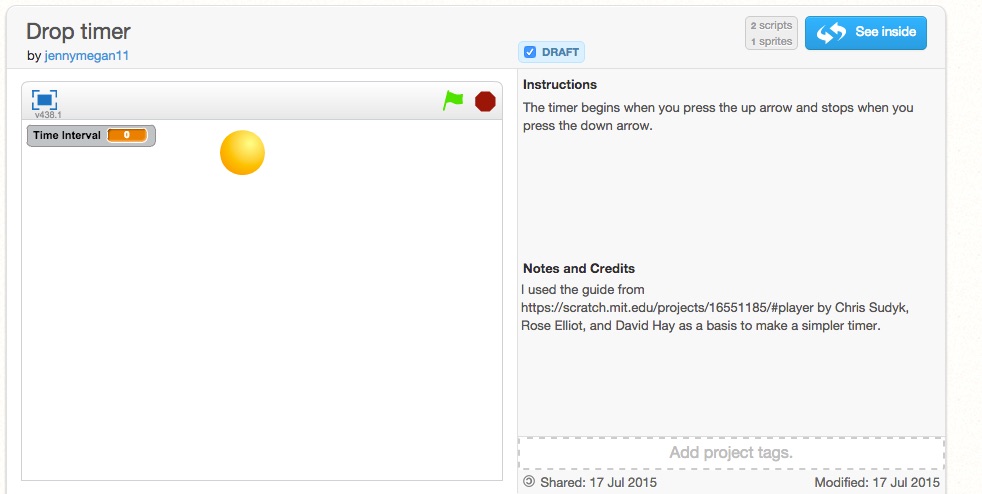 | Step 4: Playtime! Load the Drop Timer program by clicking the link. Once the page loads, connect your Makey Makey to your computer's USB port. To use the timer you will release the alligator clip that connects your object to the up arrow so that it falls onto the tinfoil pad below. When you are ready, click the green flag to begin! Hints: Practice this a few times before so you know your Makey Makey is working properly! When the keys are activated the green light above the key will light up, if yours aren't lighting up be sure that you have the grounding wire connected to your object. |
I was inspired by the links posted throughout the blog post. As I was researching and going through these links I noticed that so may of the websites that were helpful to me had pictures or videos. The Makey Makey seemed somewhat overwhelming at first because I have not had much experience with circuitry. The pictures and videos online though made such a difference! Having these multimodal elements really made a difference in my own confidence using the Makey Makey. As I was working on this post, I realized the importance of these multimodal elements. We often think about presenting information in different ways for students but all everyone could use different ways of visualizing information!
The pictures and video used were all taken by myself.
References
MakeyMakey Quick Start Guide. (2012). Retrieved July 17, 2015, from http://www.makeymakey.com/howto.php
Mishra, P., & Koehler, M. J. (2008). Teaching Creatively: Teachers as Designers of Technology, Content, and Pedagogy. . Retrieved July 15, 2015, from http://vimeo.com/39539571
Sudyk, C., Elliot, R., and Hay, D. (2014). Retrieved July 17, 2015 from https://scratch.mit.edu/projects/16551185/

 RSS Feed
